Home comforts: Rice pudding

Deliciously creamy rice pudding with a golden brown crust

Deliciously creamy rice pudding with a golden brown crust

The vast majority of us think of rice pudding and associate it with school dinners. The same can be said of semolina. Now, both of these dishes seem to have the marmite effect. You either love them or you hate them.

As you can probably guess, I absolutely love them! I’ve never made rice pudding before, so I thought it’s high time I learned to make this old classic. I blame Nigel Slater and the Hairy Bikers. When I was in the middle of Lent, I watched Nigel Slater’s television programme and drooled as he made a rice pudding accompanied by a number of sweet fruits. The following week, the Hairy Bikers appeared on my screen and lo and behold, they were making the same dish. (Well more traditionally, without the fruit)

While I wasn’t particularly enthusiastic by the fruit, I thought ‘that doesn’t actually look too hard’ so another challenge was set. It took me a while to get round to making it, but one rainy afternoon, I set myself to task.

My first port of call, with regard to recipe hunting was none other than James Martin, the king of good puds. Looking through his recipe book The Collection: with 300 classic recipes, I thought there has to be a rice pudding recipe here. I wasn’t wrong. I found a baked rice pudding recipe nestled in the ‘Cream, Eggs and Vanilla’ chapter.

I went to the supermarket and typically had fun wandering around in circles trying to find pudding rice and a vanilla pod. After locating the vanilla in the herb and spices section…I also nearly had a heart-attack looking at the price of a jar containing a solitary pod £2.55! Anyway needs must and I purchased it.

Returning home, I set to it and lightly buttered an ovenproof casserole dish. I weighed out the rice and washed it under cold water and left to drain. I brought the milk and cream to the boil in a saucepan with the ‘cheap’ vanilla pod.

I then took my eye of the ball and allowed it to bubble over. The result was milk and cream everywhere, a lot of kitchen roll and an awful smell (although not as bad as the treacle smell with the ginger cake). My first thought was ‘ oh no I’ve ruined it and I paid £2.55 for the damn vanilla pod!’ My second and more practical thought was just pour in some more milk and cream (thankfully I had enough ) and the situation will be resolved.

I allowed the milk and cream to boil (this time with no dramatic bubbling and keeping an eye on it like a hawk) and added the rice and sugar. I then stirred it well. After a few minutes of stirring, I poured the mixture into the greased casserole dish (complete with the vanilla pod) and sprinkled some ground nutmeg over the top. I also dotted it with a few small knobs of butter.

I baked the mixture for 15mins at 180C, before lowering to 150C for 1 hour 15mins. Removing the pudding from the oven, it had a golden brown crust. I couldn’t contain myself! I was straight in there with a teaspoon, scooping up the creamy pudding. Mmm and I wasn’t disappointed. It was even more delicious than I remembered it had been at school.

All in all this recipe is an old classic that anyone who loves rice pudding should attempt. It’s definitely easy, as long as you don’t let the cream and milk bubble over! Also, moaning aside about the cost of the vanilla pod, this completes the dish, giving it an extra taste sensation. To leave it out would be a catastrophe!

Even if you didn’t like rice pudding at school, why not try this recipe and see if you’re a rice pudding convert? Go on I dare you!

Baked Rice Pudding

Baked rice pudding - much nicer than at school!

Baked rice pudding – much nicer than at school!

What you need

25g butter (Plus extra for greasing)
100g pudding rice
450ml whole milk
450ml double cream
1 vanilla pod, split
75g caster sugar
Freshly grated nutmeg (or ground nutmeg)

Method

1) Preheat the oven to 180C. Lightly butter an ovenproof dish (about 1-1.8 litres in capacity)

2) Wash the rice in cold water and allow to drain.

3) Bring the milk and cream to the boil with the vanilla pod and add the rice and sugar. Stir well.

4) Pour into the ovenproof dish and grate or sprinkle the nutmeg over the top. Dot with a few small knobs of butter.

5) Bake for 15mins, then lower the temperature to 150C and bake for 1 hour 15mins. The pudding should be golden brown and creamy underneath. Best served warm.

Posted in recipes | Tagged , , , , , , , , , , , , , , , , , | Leave a comment

Review: Merienda cafe, Carlisle (My new favourite eaterie in Carlisle!)

An extremely tasty lunch at a delightful cafe

An extremely tasty lunch at a delightful cafe

For a long time now, I have visited Carlisle on shopping trips and lamented about the lack of good lunchtime eateries. I even found myself telling my sister: “I just can’t understand why there aren’t many places the city centre that offer a nice selection of sandwiches, salads, tapas-esque food using local produce in a nice contemporary setting where you could have a decent cup of tea or coffee or even a glass of vino.”

Hold on, I think I’ve finally found one!! I’m now going to share it with you all.

By chance, I was shopping in Carlisle over the bank holiday weekend. The weather was beautiful and despite the fact that a car rally was being held through the pedestrianised city centre which proved to be blimmin’ annoying as you tried to navigate between shops,  I luckily stumbled across what is now my new favourite Carlisle café.

Shopping with a friend, she suggested we take a stroll through the dank alley next to McDonalds and see what eateries were behind it by the Cathedral. I must admit I was sceptical, as we walked through but perked up instantly as soon as we found ourselves in a beautiful little courtyard. Seconds away from the hustle and bustle of the city centre this little courtyard is historical, unexpected, delightful and surprisingly tranquil. I never knew it existed! I wonder if you did too?

Merienda is an independent café, with a sister establishment in Cockermouth. It is set in a secluded courtyard (Treasury Court) in Carlisle’s historic quarter. It is half in the old treasury building and half in a contemporary glass structure. Entering, it has a relaxed atmosphere. It is modern, with a pine floor, exposed brickwork, large communal tables and benches. The glass addition, fills the café with a wealth of natural light making it a beautiful space to sit and look outside. We visited as the weather had turned warmer and sitting in the glass addition, the glass doors leading to the courtyard were propped open, allowing a gentle breeze to float through. There are also a number of outside tables. Certainly, a perfect place to sit and have a drink or food in the sun during summer.

Before I wrote this review, I decided to look up the interesting name. I was  informed by the ever useful internet (namely Wikipedia) that ‘Merienda’ is a light meal in Southern Europe (Spain, Italy, Croatia), Latin America and the Philippines.  Usually this is a light meal or snack served between breakfast and lunch and/or between lunch and dinner.

Merienda, Carlisle serves a range of homemade cakes, baked goods and light bites, but they also cater for breakfast, lunch, tapas and open late on Friday evenings with entertainment. Their venue can be hired for functions. They also offer outside catering for a variety of events from business lunches and dinners, to indoor and outdoor parties.

The café places an emphasis on using high quality coffee and is one of the few places outside London to serve Square Mile Coffee. Square Mile Coffee Roasters which is based in London, was created by the 2007 World Barista champion James Hoffman, who originally hails from Keswick.

Merienda also stresses the importance of using local Cumbrian products. Their website says: “We are passionate about using local supplies and fair trade  organic and local produce feature highly on the menu. We are continually inspired by the quality of produce that Cumbria provides.”

They add: “We believe in local and of being healthy and happy in our lifestyles and wanting to provide our customers with food that is fresh, seasonal, colourful and irresistible,”

I believe these mission statements are extremely significant and great mantras to follow.  Now it is so important that independent businesses support other local independent businesses and shop local. Cumbria has a wealth of great, fresh food products and it is imperative that cafés and restaurants make use of the products on their doorsteps. Cumbrian food should be celebrated. Offering organic, fair-trade and food for a range of dietary requirements such as gluten free, has also become increasingly popular and necessary.

The description of the food being fresh, seasonal, colourful and irresistible would certainly sum up my experience of Merienda. I decided to try a bocadillo, a Spanish name for a sandwich made from Spanish bread cut lengthwise, not sliced bread (basically a baguette).  You get the opportunity to create your own sandwich, selecting from a range of ‘Extras’. For £5.75 you can choose two ‘Extras’ and a chutney. There is also the opportunity to add further ingredients for an added 90p. You can choose from meats: chicken, ham, bacon, chorizo, salami and tuna. Vegetables are: Avocado, cucumber, lettuce, roasted peppers, sun-dried tomatoes, Kalamata olives, hummus and even baked beans! There are cheese options with feta, cheddar and brie. There are also a number of chutneys: Carrot and Orange Chutney, Cumberland Chutney with Snecklifter Ale, Red Onion Marmalade, wholegrain Mustard, mayonnaise.

As you can imagine, when faced with this many exciting options you are left with a difficult decision. I could have concocted a range of different fillings. In the end I decided to go with feta cheese and sun-dried tomatoes. I didn’t choose a chutney, as I wasn’t too sure that any of the options would go with my desired fillings. I also decided to have a cranberry juice. I would have had a glass of wine but I was driving and it was too hot for a cup of tea.

Red cabbage coleslaw, a mixed green salad and an extremely tasty bocadillo

Red cabbage coleslaw, a mixed green salad and an extremely tasty bocadillo

We were left waiting for about 10 mins at the most before our food arrived. My bocadillo consisted of a large white homemade baguette. The bread was very fresh. There was plenty of feta inside and it was lovely and creamy. There were a number of sun-dried tomatoes and it was certainly tasty. Accompanying the sandwich, there was a large mixed leaf green salad with beetroot cuttings and a side of red cabbage coleslaw.

The coleslaw which was purple in colour was vibrant and colourful, as was the salad. They were appetising to the eye as well as taste. The coleslaw was absolutely delicious and creamy. The salad worked well with the sandwich and my chosen fillings. This was the perfect lunch for a warm, spring day. The portions were a fantastic size, not too much and not too little and I ate the lot.

The service was very good. We were shown to a table promptly on arrival, our drink order and food order was taken quickly but we weren’t rushed and our food and drinks came extremely quickly. All of the waitresses were extremely friendly, polite and attentive. I would say that I think bills should be brought to the table, but this is only a minor criticism.

So was the lunch reasonable? Yes, definitely. I paid just over £7. Will I go back? No question about it, next time I’m in Carlisle I will certainly be returning. I’ve already sang Merienda’s praises to all of my friends and family. This place is WELL WORTH a visit next time you’re in Carlisle and want a drink, lunch or light snack. I hope you enjoy it as much as I did!


Posted in reviews | Tagged , , , , , , , , , , , , , , , , , , , , , , , , , , , , , | 1 Comment

Review: Treeby and Bolton Cafe, Keswick

Homemade banoffee pie

Homemade banoffee pie

Often, I am so consumed in my own baking exploits that I visit our local café’s and restaurants and completely forget to get a picture of my food nevermind actually blogging about my experience. I hear you say, isn’t this a Cumbrian food review blog too?

Yes, therefore I am delighted to share my thoughts on this delightful little independent coffee shop. Nestled in the centre of Keswick, Treeby and Bolton’s is a little gem which could easily be missed. Located below the gallery, this café can be accessed by entering the shop and going down the staircase at the back of the gallery or down the adjacent side street through a side door.

The café itself is contemporary in style, with brightly painted walls and art on display. At the bottom of the stairs, the counter is positioned straight ahead, with a huge dessert display case. This is the show stopper, shelves upon shelves of ridiculously large but amazingly appealing cakes. Every time I go in, I stand and drool at its offerings.

One downside of this café is its size. There are seats and tables positioned left and right along the long narrow room. Through a doorway on the opposite end of the room from the counter and staircase is another smaller dining room with several tables and large windows.  The tables in this room are all low with low seating, whereas some of the seating in the main narrow space is on high chairs and high tables. This is very modern and obviously a decision with regard to space restrictions but difficult if you’re with older people or young children. It can be a little awkward but it hasn’t been a huge problem for me. As it is a small space, it is often very busy at lunchtimes and can be hard to get a table, particularly if you’re in a larger group.

Let’s move onto the food and drink then shall we? Of course that’s the most important part! There is a varied drink offering, with a good selection of coffees, teas, soft drinks and alcoholic beverages. I usually have a loose leaf Suki tea which are lovely. I do prefer loose leaf tea, much tastier than your normal tea bag. On my most recent visit however, I had a cranberry juice which was a nice alternative.

I have tried the homemade scones which are very tasty and are accompanied with clotted cream and jam. I have also sampled a slice of bakewell tart which was a good bake. I also accompanied my mum to the café for lunch a few months ago.

The menu is certainly varied. It has an assortment of sandwiches, salads and main meals. It’s not your ordinary café menu and it offers that little extra je ne sais quoi. My mother very much enjoyed her flaked mackerel, bound with crème fraiche, served with a delicious side salad and homemade bread.

I had an open ham sandwich. Thick succulent slices of cooked honey roast ham arrived on slices of homemade rye bread which was truly delicious in itself. It arrived with a tasty salad and some crisps. There was also a chutney which was perfectly nice, but to be honest I didn’t particularly have much of it, as I was enjoying the ham by itself so much.

On my last visit to Treeby and Bolton, I decided not to have some lunch. Unlike the rest of my family, I forwent the delicious sandwiches and salads, completely seduced by the dessert display. The only problem was there were too many to choose from. From a huge lemon meringue pie, carrot cake, toffee cake, a Victoria sponge, to an array of tray bakes.

While the lemon meringue pie looked exquisite in size and appearance, it faced strong competition from the banoffee pie which I eventually plumped for. On receiving the cake, my first thought was ‘that’s enough for two people.’ My second thought was, ‘look at how much cream there is, how many calories will that be?’ and my third was ‘just dig in.’ So, I did.

Look at all that cream!

Look at all that cream!

So what did it taste like? Well, I’m sad to say that it was good but not quite good enough and if I’m being a little critical, a little disappointing. The pastry base was perfect. It was thin, crispy and no soggy bottom in sight. The banana pieces were plentiful and chunky. The only problems were the toffee sauce and cream. I would have preferred more toffee sauce to create a better balance between the cream and banana. There was a lot of cream. Perhaps a little too much in retrospect. But while it was delightfully whipped and perfect in texture, it was let down by the hint of coffee in its taste. I wasn’t really expecting this taste from a banoffee pie and it was strange. More so because I don’t particularly like coffee, so had I known, I wouldn’t have had the banoffee pie. Although I ate most of it, I did find myself spooning off some of the cream. Next time it’ll have to be the lemon meringue pie I think!

So finally, what are the prices like, I hear you ask. Well they’re certainly Lake District prices. It’s not inexpensive, but with good quality products and an array of actually homemade offerings it is worth paying that little bit more.

All in all, I certainly would recommend it to anyone visiting Keswick, whether you’re local, on holiday or just passing through, it’s a perfect lunchtime destination.

Posted in reviews | Tagged , , , , , , , , , , , , , , , , | Leave a comment

Spiced ginger and honey cake

Spiced ginger and honey cake with a gooey glaze

Spiced ginger and honey cake with a gooey glaze

My dad strikes again. One would have thought that my cheese and rosemary scone offering would have sufficed and put his begging to an end, but no, it seems to have had the opposite effect and actually spurred him on. We were reading the Sunday newspapers and magazine supplements, when my dad suddenly thrust a magazine in my face.

“Look there’s a whole baking section here,” he said, pointing at the middle section of the Sunday Times magazine. Turning over the pages for me to peruse, maybe a little to quickly for my liking, he declared, “Oh I love ginger cakes.” Stopping at a ginger cake recipe, he said, “You could attempt that one next.” Thanks dad..?

I didn’t hear the end of it for a few weeks. “Did you save the copy of the magazine with the ginger cake recipe in it Emma?” “When are you making me that ginger cake?” Of course, I relented.

In the glossy magazine, the cake looked decidedly delicious. A tea loaf like cake resting on a cooling rack majestically. The glaze oozes off it as if it has just been poured over and the ginger pieces on the top are scattered like jewels. “It looks delicious,” my mum enthused.

Here’s the truth. I don’t really like ginger cake. As I drove to the shops to pick up the ingredients I thought this is certainly daughterly love. As much as I love baking and giving my offerings away, I like baking things I truly love.

All in all this isn’t really a difficult recipe and if you love ginger it’s a winner. I preheated the oven. I greased my loaf tin. I then put my butter, sugar syrup, honey, treacle and orange zest in my saucepan and cooked until it had melted. Probably the most infuriating bit was trying to scoop out the treacle. It was a big black sticky mess. Thank goodness I bought a squeezable bottle of syrup.It also didn’t help that the treacle and honey was measured in grams in the recipe. I admit, I guestimated both. I also realised that I don’t particularly like the smell of treacle. It’s not something we usually have in the house and its strong smell was off-putting and pungent.

Butter, sugar, syrup, honey, treacle and orange zest mixture

Butter, sugar, syrup, honey, treacle and orange zest mixture

This aside, I had a task in hand. I allowed the mixture to cool, before putting the flour into the mixing bowl, adding ground ginger, mixed spice, ground cloves and cinnamon. The recipe had suggested to use 3 balls of preserved ginger, which it advised you to chop finely. After eventually locating the ginger in Sainsbury’s after doing several circuits, I came to the conclusion that it would be much easier to buy a jar which was already diced. Even better!

I scooped out the equivalent of two-thirds of what would have been three balls and added this to my mixture. I then mixed this together, adding the cooled melted butter mixture. To this I added the eggs and milk and combined thoroughly using my trusty wooden spoon.

Add the eggs followed by milk

Add the eggs followed by milk

Thoroughly mixed and ready for the loaf tin!

Thoroughly mixed and ready for the loaf tin!

That’s basically it. Simple, see. I spooned the mixture into my loaf tin and baked for just over an hour. I prodded it with a skewer to check it was baked throughout and the top was a rich golden brown. In the light of my kitchen it looked very dark and to the untrained eye burnt, but it certainly wasn’t. I then tipped it out onto my cooling rack and observed it… A good bake!

Covered with a gingery glossy glaze

Covered with a gingery glossy glaze

I then made the glaze which constituted of apricot jam, honey, syrup from the preserved ginger and the remaining third of chopped ginger. I heated these in a saucepan over a low heat until it started to bubble. The recipe advised me to pour the mixture over the cake…hence the glossy picture with the poured over effect. However, my instinct told me that I should use a pastry brush to brush the glaze on. I couldn’t resign myself to the thought of making a sticky mess all over the work surface and having to wipe it all up. Jamie Oliver throwing ingredients here there and everywhere over the work surface I am not.

Ready to eat!

Ready to eat!

After brushing the glaze on to the cake, I served a slice to my parents. I had a tiny corner, but I’m afraid I couldn’t stomach the strong ginger taste. My parents thoughts, I hear you ask…? Well, they loved it. Both of them love a good strong ginger cake and they ate the whole thing in a few days, taking hefty slices with them to work.

I wonder if I’ve pleased my dad enough to avoid new recipe pestering..? I wouldn’t hold my breath…I’m sure another will follow soon!!

Spiced Ginger and Honey Cake

ginger 5

What you need: 

100g butter
100g dark muscavado sugar
2tbsp golden syrup
75g honey
100g black treacle
Grated zest 1 orange
150g self-raising flour
2 tsp ground ginger
1tsp mixed spice
1tsp ground cinnamon
1/2tsp ground cloves
3 balls preserved ginger, chopped (reserve 2tbsp of syrup)
2 eggs
5 tbsp milk

For the glaze:

3 tbsp apricot jam
1 1/2 tbsp honey

Method

1)Preheat the oven to 160C. Put the butter, sugar, syrup, honey, treacle and orange zest into a saucepan over a medium heat and cook until melted. Stir well, remove from the heat and allow to cool slightly.

2) Put the flour in a mixing bowl and add the ground ginger, mixed spice, cinnamon, cloves, and two thirds of the chopped ginger. Mix together.

3) Add the cooled melted mixture and stir well. Next, crack in the eggs and pour in the milk. Stir thoroughly and spoon the mixture into a greased loaf tin. Bake for 1 hour.

4) Take out of the oven and tip onto a cooling rack. Put the apricot jam, honey, syrup and remaining chopped ginger into a saucepan. Heat on a low heat until it starts to bubble. Pour over the cake if not ridiculously obsessed with cleaning. Or in my case, brush over the cake with a pastry brush.

5) Enjoy the cake when it’s still warm.

Posted in recipes | Tagged , , , , , , , , , , , | Leave a comment

A Taste of Italia: Chocolate, Almond and Orange Biscotti

Crispy, orangey, chocolatey biscotti and a cup of tea!

Crispy, orangey, chocolatey biscotti and a cup of tea!

I was lucky enough to work in Italy for two Summer periods while I was a student. What could be better than looking after children, teaching them English in the glorious sunshine and beach front location of Golfo Aranci, Sardinia? Nothing! I was also invited to accompany one family to their home by Lake Como and to Madesimo in the Italian Alps. It was a glorious way to earn some money, life experience, travel and to learn about Italian culture.

During my first trip, where I was kept on my toes by five children aged between 5-16, I was treated like family, as if I was one of their own. That particular summer left me with a ream of memories and I forged a lifelong friendship with the family.

Of all the memories, most typically for me, the most poignant are of food. I have already discussed in a previous post how I baked banana bread for the children, who would swoop on it like a flash as soon as it came out of the oven. They would devour the loaf while it was still warm. This was me giving the Italian family a little taste of England with a cup of tea. They showed me their culture and I showed them a little bit of ours. It was also a feat trying to find a rising agent in Sardinia as bread there is typically flat.

Typical Sardinian bread

Typical Sardinian bread

This is another memory. The Sardinian bread, otherwise known as ‘carta da musica’ (music bread) or Carasau. It’s a flat bread, comprising of thin, crispy sheets. It comes packaged in pizza-like boxes. They look very much like poppadoms but even thinner. They have a long storage life and are often nibbled as a snack or an accompaniment at dinner. After my initial surprise that this was all the bread there really was, I realised how much I loved it. I recently found some being served in a restaurant and was overjoyed to see it in England. (I should add it to my list of future bakes!)

Pane Carasau!

Pane Carasau!

From Italian gelato, to foccaccia, to mozzarella, to Sardinian suckling pig, to roasted mutton and of course every type of pasta you can imagine, my experience of Italian food during this trip was fulfilling and eye opening. It was also of course, delicious in every way.

One, Italian speciality I didn’t try was biscotti. These ultra crispy Italian biscuits are divine when accompanied with a fresh cup of coffee or tea. Perfect for dunking, it takes a good dunk to make them soggy!

Italian delicacy. Great with a cup of tea or coffee

Italian delicacy. Great with a cup of tea or coffee

As my bread making adventures continue, with the aid of Paul ‘the God of Bread’ Hollywood’s book and television series, I came across this recipe and thought I’d give it a go. It didn’t look overly easy but it wasn’t on the high level of difficulty of sourdough (I am gearing myself up to that one). After baking the biscotti, I told friends and friends of my parents about my recent adventure and was completely shocked to discover how many people didn’t know what they were. Hopefully, this blog will celebrate the biscotti and spread its good name.

Mr Hollywood makes a trio of biscotti but I decided to try one of the flavourings. I should correct myself at this point, my sister told me which flavour she wanted.  Chocolate, almond and orange it was.

In a biscotti, the dough is baked in a log shape first. It is then cut into slices and baked again, so the biscuit has a dry, crispy consistency.  ‘Biscotti’ aptly means twice- cooked!

Ok, so here is my experience. It wasn’t all plain sailing I must say! (The recipe and method follows at the end of the blog) I heated my oven, lined a baking tray with baking paper, so far so good.

Next, I mixed the flour, baking powder and sugar in a bowl. For the chocolate biscotti. Paul advises that you need an extra 30g of flour. I heeded this advice and stirred in the beaten egg, a little at a time, until all were incorporated. The recipe said to use between 2 and 3 eggs and advised that using all may not be necessary. The dough, it said, shouldn’t be sticky. Again there was a note for the chocolate biscotti that because you would be adding melted chocolate, this would add to the stickiness of the mixture, so you should be careful with the amount of egg you add. I added my three eggs, which proved necessary to incorporate all of the mixture.

I melted my chocolate (in the microwave in 20-30 second blasts) and cooled until it was tepid. I then added it to the dough mixture but it didn’t form a firm dough, as it was supposed to. Time to panic? No, I held my nerve but was bemused that it was still a bit crumbly. I chopped the almonds in half and grated my orange zest. I added these to my dough mixture, including the chocolate chips and vanilla extract. I mixed the ingredients thoroughly with my hands. Still and obviously, it didn’t form a firm dough. I added a little bit more egg and voila it held without being too sticky.

I turned my dough out onto a floured surface. I kneaded it and halved the mixture. I then rolled it into logs and but it on the baking tray to bake.

Rolled into logs and ready for the oven

Rolled into logs and ready for the oven

After baking for 30-35mins I took it out of the oven. It looked a little soft to me, so I put it back in for another 5-10mins. I then let it cool, this firmed the dough up and I lifted it to a board to cut. Slicing, for the most part, was fine however, one piece didn’t cut cleanly and broke up. The key here was to be firm but retain a gentle quality.

Cut into slices, ready to be  baked for the second time

Cut into slices, ready to be baked for the second time

Ready to be crispened up!

Ready to be crispened up!

I then placed my slices back onto the baking tray and returned them to the oven for 30mins. I turned them halfway through and made sure they were dry in the centre before taking them back out of the oven and leaving them to cool.

All in all, the biscotti were finally successful. Maybe my eggs weren’t big enough and that is perhaps why I didn’t get a firm dough at first, but I used my initiative and corrected the problem. Hopefully, if you encounter the same issue, this will help. My mum who is highly critical of everything commended the biscotti as my best bake yet, which is certainly high and rare praise. They were even enjoyed by all of my sister’s work colleagues. They had a perfect crunch and the balance of orange, chocolate and almond was just right. A delightful afternoon delight with a cup of tea.

Leave to cool before tasting

Leave to cool before tasting

Chocolate, Almond and Orange Biscotti

What you need

280g plain flour
1/2 tsp baking powder
250g caster sugar
3 eggs, beaten (extra if you have the same problem as me!)
50g good-quality dark chocolate
135g blanched almonds
50g chocolate chips
Finely grated zest of one orange
1/2 tsp vanilla extract

Method

1) Heat your oven to 140C. Line a baking tray with baking paper.

2) Mix the flour, baking powder and sugar together in a bowl. Stir in the beaten eggs, a little at a time, making sure the mixture is incorporated Continue until you have a firm, non-sticky dough.

3) Melt the dark chocolate, either over a bowl over hot water, or in the microwave. Allow the cool. Chop the almonds. Grate the orange zest. Add the melted chocolate to the biscotti dough and stir until evenly incorporated. Add the almonds, orange zest, chocolate chips and vanilla extract. Mix until well combined.

4) Tip onto a floured surface, knead and divide in half. Roll each section into a long log about 4cm in diameter. Place the logs onto the baking tray, spacing them apart as the mixture will spread. Bake for 30-35 mins. (I baked for about 40mins)

5) Take out of the oven and place on a cooling rack for 10mins. The dough will firm up a bit. Put the logs onto a cutting board. Cut, on the diagonal into 2-3cm thick slices.

6) Place the slices on a lined baking tray cut side up. Return to the oven for 30 mins. Turn half way through this time. The biscotti should be dry throughout. Transfer to a cooling rack and cool.

Posted in recipes | Tagged , , , , , , , , , , , , , , , , , | Leave a comment

Tasty and good value pub roast dinner: Sandford Arms

Hello readers! After a steady few weeks of recipes, here’s another review for you to peruse at your leisure, comment on and share. Personally, I believe there’s no greater British meal than a good old Sunday roast, especially a roast beef dinner. The French even refer to us as ‘les rosbifs’. Pretty inoffensive, I’m sure you’ll agree, as it’s a national dish to be proud of. There’s nothing more heart-warming than thick slices of succulent beef, lashings of gravy, fluffy Yorkshire puds and a crispy tatty.

Usually, I don’t tend to go out for Sunday lunch, as now I’m living back at home, Sundays are usually mum’s roast day. I’ll throw it out there, I have never had a roast that equals or betters my mum’s. She is the queen of the roast dinner. There is of course time for someone out there to prove me wrong! But, even mums are entitled to a day off now and again.  So a few weeks ago we decided to go out for a family Sunday lunch.

Normally, we eat a Sunday roast in the evening, so it did feel odd to prepare myself for a good feed at lunch time. Nonetheless, I had a meagre breakfast and put on my Sunday best. Many pubs in Cumbria offer a Sunday lunch (I’m sure as this blog progresses, I will get to sample many) with varying menus and degrees of success.

This Sunday, we had decided to visit the Sandford Arms. We decided at the last minute where to go and chose it because of its close proximity. It had been several years since I had visited this pub. We used to go there for family get togethers and celebrations when I was younger. My mum had been to a party there over the Christmas period and had sung its praises and its extensive menu.  We rang to book a table before we left, however this proved to be quite unnecessary, as it was quite quiet.

On arrival, we were served drinks and were told that the menu was on a board. There were several starters, including soup, garlic mushrooms and brie wedges. For mains, there was roast beef, roast lamb or vegetarian lasagne. There was also an assortment of deserts. I had expected a larger menu and we all commented on the small selection but on reflection, we wanted Sunday dinner, most people do on a Sunday, so really is there any need to have an extensive menu. Perhaps not.

We all decided to have roast beef. After a short wait of only about 15-20mins, we were shown to the dining room. It was quite quiet in the restaurant. There was only one other table of diners. While it was warm and reasonably comfortable, the dining area could perhaps do with a bit of refurbishment. It looked a little cafe-like through decoration, table setting and lay-out.

We were served our food and in appearance it looked very good. The plates were white, circular and contemporary and the beef was piled in layers. On the side, there was some creamy mashed potato, three roast potatoes and a giant Yorkshire pudding. The meat was covered with gravy. I must admit that these puddings looked like they hadn’t risen properly.

An appetising Sunday roast

An appetising Sunday roast

The vegetable accompaniments were mashed carrot and swede, cabbage and garden peas. These came in a large dish with two compartments. There was certainly plenty for the four of us. On a picky note, maybe there should have been three compartments, so the peas weren’t hovering over both of the other accompaniments.

Plenty of vegetables!

Plenty of vegetables!

So how did it taste? That’s the crucial question. And the answer is relatively good. The beef was tasty, maybe a little over cooked for my liking, but it was tasty and succulent. It was cut into thick pieces and there was plenty. The potatoes were crispy and well browned, but I thought the potato inside could have been fluffier. The mashed potato was one of my favourite parts. It was buttery and smooth and utterly delicious. The Yorkshire puddings were fine, but I don’t think they were put in fat that was piping hot, as they had deflated and spread out rather than rising upwards. I love peas so they were a hit and the carrot and swede was delightful. The gravy was also very good. The service was excellent and the waitress was polite and attentive.

All in all it was a good pub roast. It wasn’t perfect or knock-out incredible, but it was good value and tasty.

Posted in reviews | Tagged , , , , , , , , , , , , , , | Leave a comment

Ultimate cheese scones

Cheese and rosemary scones

Cheese and rosemary scones

My dad has been pestering me to make cheese scones for a few weeks now. I can’t remember what television programme we had been watching at the time, but he saw someone serving cheese scones and pointed out that he loves them but never gets them. I didn’t hear the end of it for weeks.

Last weekend, I finally got a copy of Paul Hollywood’s Bread. Flicking through the book, I noticed a cheese scone recipe, so I thought I’d put aside my hankering for biscotti and brioche and make my dear dad some as a gift.

Lathered with butter

Lathered with butter

Now, my pet hate with cheese scones is that they are either not cheesy enough or bland. Reading Hollywood’s recipe, his scones certainly didn’t sound bland. He used rosemary to give it depth and there was cheese in the scones as well as on top. Certainly, no cheese curbing!

Very cheesy scones cooling

Very cheesy scones cooling

Hollywood’s version probably had added flavour in comparison to my scones, as he used three types of flour: self-raising white, wholemeal and malted flour. Both self-raising flours would make the scones rise and the book advised that the malted flour would add a sweet dimension.

Because I couldn’t find malted flour and wholemeal when I needed them, I just used white self-raising flour. I don’t think this was detrimental to my final scones. They rose perfectly and tasted delicious. So, if you find yourself in the same position, let me assure you that only using the one type of flour is perfectly ok.

This recipe was very, very easy. I’m sure most of you learnt how to make scones at school. I remember the learning process vividly and my delight when my scones rose and turned golden to perfection. It only took about half an hour to recreate these cheesy, herby delights and they made a perfect lunchtime nibble.

Perfect lunchtime snack served warm with butter

Perfect lunchtime snack served warm with butter

Taking them out of the oven, after the cheese on top had browned, I let them cool slightly on a rack before cutting into them, to see the herby fluffiness inside. While they were still warm, I lathered them with butter and arranged an assortment onto a plate, taking it down to the building site where my dad works.  After surprising him and his colleagues with this lunchtime treat it was good to listen to the ooohs and ahhs as they savoured each mouthful.

Ready for the workmen

Ready for the workmen

Returning home, I lightly warmed another scone and ate mine with butter and a good brew. I usually don’t like to blow my own trumpet, but it was truly delicious. The extra cheese and the rosemary make the scone extremely flavoursome. Hollywood recommends eating the scones with soup, cheese or using the mixture to top a cobbler dish. He also includes a beef cobbler recipe. After eating my scones and reflecting on this idea, it sounds perfect! Maybe I will have to try this out too?

Cheddar and rosemary scones

Ready for the oven

Ready for the oven

What you need

250g self-raising white flour
Pinch of salt
1tbsp of rosemary
150g Cheddar
175g full-fat milk
1 egg, beaten
Plain flour, for dusting

Method

1) Heat your oven to 220C. (If using Hollywood’s recipe, mix together 80g self-raising flour white and 100g of wholemeal self-raising flour and 65g of malted bread flour.) If using my take on the recipe, add the 250g of self-raising white flour to a mixing bowl. Add the salt, rosemary and 100g of the grated cheese. Pour in most of the milk, mixing with your hand or a spoon. Make sure the mixture is evenly combined. Slowly add the remaining milk to form a soft paste. (You may not need to use all of it)

2) Tip the mixture onto a lightly floured worktop. Fold it together to form a soft dough.

3) Roll the dough into a circle, about 2.5cm thick. Cut out as many rounds as you can. (Hollywood uses an 8cm plain cutter) I used a 6.5cm plain cutter. Hollywood advises that his recipe makes 6 scones. I made 8. Rub your cutter in flour and press in a downward motion before lifting up, rather than twisting the cutter.

4) Brush the tops of the scones with the beaten egg and sprinkle with the remaining cheese. Put them on a baking tray (lined with baking paper or greased) and bake for 15-20mins, until the scones have risen and are golden in colour. My scones took the full 20mins.

Scattered with enough cheese

Scattered with enough cheese

5)Place on a rack to cool or eat when they are warm. The scones can also be freezed.

Posted in recipes | Tagged , , , , , , , , , , , , , , , , | Leave a comment

Easter Sunday Cadbury’s Creme Egg Brownies: Hurray Lent is finally over!

Creme Egg Brownies!

Creme Egg Brownies!

So Easter Saturday came, one more day until a delicious day of sweet heaven. What better way to spend a day than buying my sweet treats for Easter Sunday and putting myself through the purgatory of baking.

Purgatory? Wait a minute you may ask…I thought you enjoyed baking? Yes, I absolutely adore baking, especially baking sweet treats, however I hadn’t baked sugary delights for nearly 7 weeks. My sister made a chocolate cake for work and it had me salivating at the smell. I didn’t even get involved for fear that I’d completely lose control and lick my fingers or to be more precise pick up the bowl and put my head in it.

So baking on Saturday was purgatory. Why bake on the Saturday and not the Sunday, you may ask? Well, in short, there wasn’t going to be enough time. My kitchen space and time had already been restricted by my mother who seemed to have got her religious holidays mixed up and had planned to re-cook Christmas dinner. So, it had to be Saturday and the plus point (in my head) was that they would be ready and waiting once midnight came.

Christmas dinner again!

Christmas dinner again!

As you may be aware, a certain Easter recipe has been doing the rounds on social media. Ingenious marketing by Cadbury’s has seen this recipe metaphorically explode onto all of our computer screens and have us chomping at the bit to recreate it in all its gooey chocolatey glory. So, obviously in my chocolate lusting state I had earmarked this recipe to try out asap. Creme Egg chocolate brownies it was!

Gooey,  melting and exploding Creme Eggs!

Gooey, melting and exploding Creme Eggs!

This certainly wasn’t the most taxing recipe. It was incredibly easy to follow and quick. The beauty of this is that anyone can re-create it from the elderly to young children. I started by melting the chocolate and butter. Now this can sometimes lead to problems. If I have to watch another person on Come Dine With Me create a grainy chocolate mess I may have to shout at the TV screen, because in actuality melting chocolate and butter is relatively easy, whether you do this over a pan of hot water or in the microwave.

Dark cooking chocolate broken into pieces

Dark cooking chocolate broken into pieces

Personally, I prefer to melt my chocolate and butter in the microwave. Break the cooking chocolate up into small chunks according to the required quantity and cut the correct amount of butter into small lumps and put both in a bowl. Heat in intervals of 30-40 seconds and stir in between. Within a few minutes the chocolate and butter will be melted to perfection. Stir and resist the urge to put the spoon in your mouth. This was the height of temptation.

Melted chocolate and butter...mmm

Melted chocolate and butter…mmm

After mixing the sugar and eggs using an electric mixer until it reached a thick milkshake consistency, I folded in the chocolate mixture and then the flour and cocoa powder. The recipe could be a little more detailed I thought, for novices. The electric mixing stage took a good 5 minutes and a folding tip could be useful, so the cook doesn’t take all the air out of the mixture.

Whisking the sugar and eggs

Whisking the sugar and eggs

Folding in the melted chocolate

Folding in the melted chocolate creating a marbled effect

sift the flour and cocoa powder

sift the flour and cocoa powder

Personally I cut through the middle of the mixture in a straight line and tipping the bowl circle under the mixture, repeating with the cut and circling motion, folding delicately. Once all the ingredients are combined, the recipe states to pour into a rectangular baking tin.

Folding the mixture

Folding the mixture

As per usual, I deviated from the recipe. I thought it would be easier to not have to cut the brownies after cooking, according to where the Creme Eggs were placed. I decided it would be easier, different and more innovative to put my mixture into bun tins. As a result, I was left with ‘fried egg shaped’ brownies.

Well greased bun tins

Well greased bun tins

I made sure I thoroughly greased the tins and poured in the mixture. I then popped them in the oven for 15 mins. During this time, I cut my Creme Eggs in half. I had wanted to use the smaller Creme Eggs that come in a bag, partly as I thought they would not be as sickly and secondly, they wouldn’t be as calorific. Unfortunately, I could only buy the bigger ones.

Spoon the mixture into bun tins

Spoon the mixture into bun tins

To be honest, cutting the eggs in half was the trickiest part of the recipe. Some of the eggs cut in half perfectly, the rest broke up. I’m not altogether sure whether they would have cut easier if they had been put in the fridge. After 15 mins elapsed, I pushed my Creme Eggs into the top of the mixture. Then I put them back into the oven for longer than the 10 mins which the recipe stated, as they needed longer.

Pop on the Creme Egg halves pushing in gently

Pop on the Creme Egg halves pushing in gently

The delicious chocolatey aroma filled the room when the brownies were taken out of the oven. I let them cool down before scooping them out of the tins. Some of the eggs had melted, some had left the impression of having exploded, so a few weren’t as attractive as I would have hoped, but otherwise they looked appealing.

Et voila! Creme Egg Brownies!

Et voila! Creme Egg Brownies!

My first taste was breakfast on Easter Sunday, after consuming a Toffee Crisp at 2am. (I’m not entirely sure why I chose this but it tasted good!) Brownie for breakfast seemed like a good idea. In all, the brownie tasted delicious. In retrospect, I should have only eaten half. They were a little too big and over chocolatey. If I was to make them again, I’d definitely use the smaller Creme Eggs if I could source them. However, I’m sure there are plenty of people out there who like the brownies in all their chocolateyness. Cadbury’s were certainly on to a winner this year. I wonder what they’ll come up with next year?! How will we eat ours?

Creme Egg Brownies

eggs 12

What you need
185g unsalted butter
185g cooking dark chocolate
40g cocoa powder
85g plain flour
3 large eggs
275g golden caster sugar
6 Cadbury Creme Eggs, halved.
Method
1) Preheat your oven to 160C and grease your bun tins. Sieve the cocoa and flour together, removing any lumps. Melt the chopped butter and dark chocolate together either in the microwave or in a bowl over boiling water.
2) Break the eggs into a large bowl and tip in the golden caster sugar. With an electric mixer on maximum speed, whisk the eggs and sugar until they look thick and creamy, like a thick milk shake. This can take 3-8 minutes. You will know it’s ready when the mixture becomes really pale and about double its original volume.
3) Pour the cooled chocolate mixture over the mousse, and then gently fold together.
4) Hold a sieve over the mixture and shake the flour and cocoa mix over the top, fold in again.
5) Pour into the bun tins and cook for 15 mins. Cut the room temperature creme eggs in half.
6) Take the brownies out of the oven and gently press the creme egg halves into the centre of the mixture.
7) Return to the oven and bake for a further 10-15 minutes depending on your oven, check every 5 minutes. Leave to cool before removing from the tin.

Posted in recipes | Tagged , , , , , , , , , , | 1 Comment

Hot Cross Buns with a little help from Paul ‘God of bread’ Hollywood

So here it is guys, my first foray into the world of bread making. Was it as scary as I had first thought? Did my dough rise? Was it a success? Will I be moving on to greater bread heights? In short, yes!

Happy Easter - My first hot cross buns!

Happy Easter – My first hot cross buns!

Apologies for the tardiness with which I am writing this blog. As I was making hot cross buns, I should have provided my experiences before Easter weekend, to help other bread novices and to give encouragement. However, because of Easter weekend, I was rather busy. Busy eating my weight in chocolate and cakes after a hard Lent you ask? In actual fact and somewhat surprisingly, no! (I will tell you all about my sweet reunion in my next blog post) No, I was socially busy I’m afraid. However, it’s still the Easter holidays, so still plenty of time to make hot cross buns and of course this will always help you next year. Oh and it goes without saying that my blog is well worth a read anyway!

So, last week (Wednesday to be precise) I made my first proper bread. My mum will kill me for saying this, as of course I’ve already blogged about our Irish soda bread but of course that’s bread without yeast.

I had thoroughly prepped myself by watching the international football on Tuesday night instead of the Easter special Great British Bake Off, where Paul ‘the God of bread’ Hollywood (I am not taking the Lord’s name in vain mum) and Mary Berry coincidentally made hot cross buns. I had no idea. Fortunately, some kind soul had decided to record it (probably my sister, who, like many UK women, has developed a celebrity crush for the silver fox himself)

After watching or should I say enduring our nation’s lack of footballing prowess, I discovered, via Twitter why I should have watched BBC2. So Wednesday morning, my baking day took a slow start, as I felt it would be wise to watch Paul and Mary do it first. Sorry Mary, but I had to fast forward the Simnel Cake, partly because I needed to get on because of proving time and more honestly, it didn’t look like my cup of tea. Not a big fan of fruit cakes I must admit.

So watching Paul and Mary, I got the added bonus of a history of hot cross buns, a visual demonstration and we all now know, including Mary, that there is such a thing as bun essence. Of course, the pair made it look easy. Watching, taking some quick notes I thought yeah, ok that doesn’t look too hard. I admit, Paul’s kneading technique scared me a little and I needed to rewind the section where they shaped the dough into buns, but watching them take the buns out of the oven and covering them with a knob of butter I thought ‘I can do this, let’s get to work’.

hot cross buns
Switching off the TV, I measured out my ingredients and started on my adventure. (Recipe and full method follows further down) As per usual, I deviated from the recipe and method. I had already decided to follow a different ingredients list to Paul Hollywood’s, as I wanted to use different fruits and spices, but I followed his online method. I brought my milk to the boil, added butter and put my flour, salt and sugar into a bowl, making sure I then put my yeast at the opposite side of the bowl to the salt. (Paul’s handy tip) I poured in some milk, after making a well and brought the mixture together with my hands until it resembled a sticky dough. Sticky it certainly was and I had some fun trying to get the majority of it off my fingers and into a ball shape.

A sticky dough consistency

A sticky dough consistency

After achieving a dough ball, I tipped it onto a lightly floured surface and face my first fear – time to knead like Paul. Following my printed instructions from a website it stated to hold the dough with one hand, stretching with the heal of the other hand, and then folding it back on itself. Without having watched Paul, I wouldn’t have known where to start. He makes it look easy doing it with one hand, so I thought yeah I’ll give it a go like that too.

Kneading the dough

Kneading the dough

Repeating this for 5 mins, sounds like an irksome task, however, maybe because this was my first time kneading, I got a little lost in the excitement and the time flew by. Eventually, my arm did begin to ache, as Paul had said it would. Unfortunately, unlike Paul, I don’t have what Mary called a hidden ‘bullet’ to rely on. After kneading, I put the dough in an oiled bowl , covered in cling film and took a picture for you to admire on our Taste of Cumbria Facebook page, accompanied by the heading ‘Time to pray’. My confidence was particularly high at this point… (I actually did pray)

Ready to prove for the first time

Ready to prove for the first time

Now, the recipe said to wait for an hour until the dough had doubled in size. This was where I could wash up, do housework and find useful things to do. I sort of did this but I’m not going to lie, I did spend a good bit of time just watching the dough. It was like watching paint dry but it grew! This was probably less to do with my praying and more to do with my kneading and the yeast activating but I’d like to think my prayers added a little je ne sais quoi.

It has risen!

It has risen!

Anyway, back to the next stage. The recipe advised to add the raisins, mixed peel and spices at this point, with the dough in the bowl. So, I bunged them in but then remembered that Mary and Paul didn’t do this on the programme. They added these ingredients at the beginning before kneading, so I guess you can do it then but as I was following Paul’s online method, I had an extra step and an extra proving period. It was the start of a long day. Already midday…

raisins and mixed peel

raisins and mixed peel

A pot of spices

A pot of spices


After kneading the fruit and spices into the dough, which turned out to be hard to get them evenly mixed in, I put my dough back into the bowl with oil and covered again with cling film.

Ready to prove for the second time

Ready to prove for the second time

After the prior rising success and the paint watching experience, my confidence was high and I washed up again, before painting my nails and having a brew among other things. Returning to my dough an hour later it had risen again but not as much as previously.

Proved for the second time

Proved for the second time

Almost to the top!

Almost to the top!

Dividing the dough into the same size chunks proved a little difficult. Of course Paul had this snazzy bread cutter but I had to make do with a knife and my sizing judgement wasn’t as good as his so some were slightly bigger than others. I know I could have weighed each, but I’d washed and put away the scales so I thought they’d do as they were.

I rolled them into balls, as the programme had demonstrated and placed on a greased baking tray allowing room to expand. After leaving them to prove for another hour (another hour where I twiddled my thumbs) they were almost ready to pop in the oven.

Proved for the third time

Proved for the third time

I made the paste for the cross which turned out to be rather runny. After pouring half onto the worktop instead of into the piping bag, I piped crosses onto my buns. Paul’s piping technique proved incredibly useful. I would add that next time I would use a smaller nozzle as my crosses turned out a little thick.

Cross mixture and piping bag

Cross mixture and piping bag

Piping the crosses- a little bit of overspill!

Piping the crosses- a little bit of overspill!

I then popped my buns in the oven and sat in front of the door peering inside. (As you do) Halfway through the 20mins cooking time, I panicked and peaked inside. To my horror the buns were sticking together! Opening the door and taking them out, I pulled them apart. (Yes, I am blonde, at the time I didn’t realise what I was doing) After 20mins I took them out and I had nice golden hot cross buns. Now, I realise that the buns should have stuck together, so you get that flat crease on the side. But, other than that they looked good.

Now, here is where I wish I’d decided to use Paul’s recipe from the beginning. He advises you to brush the top of each bun with apricot jam to give it that sticky shine. It also sounds absolutely delicious. However, I didn’t have any apricot jam, so I had to try and create a syrup using milk and sugar. Midway through boiling the mixture, the electricity went off in my house. Fantastic timing! Although I’m mightily pleased it didn’t go off half way through bun baking. I brushed my buns in the dark with the mixture I had created which looked more like boiled milk than syrup and hoped for the best. Thankfully and somewhat miraculously it created a sticky shine but next time I will be using apricot jam. When the power was eventually restored an hour or two later I was able to take a few photographs.

Ready to eat!

Ready to eat!

All in all, my first proper bread attempt was a success. I was happy and proud of my buns and they tasted delicious. When it comes to bread, I shouldn’t have been so scared! I must admit however, that I couldn’t have done it without Mr Hollywood. I have just purchased his book, so watch out for more bread from me! Happy Easter everyone!
Hot Cross Buns

An easter treat

An easter treat

What you need
625g strong white flour, plus 75g plain flour for the crosses
45g chilled butter
45g golden caster sugar, plus 2 extra tbsp
1tsp salt
1tsp ground cinnamon
¼ tsp ground allspice
¼ tsp ground nutmeg
7g sachet of fast action yeast
1 egg
275ml milk, plus 4 extra tbsp
100g raisins
25g chopped mixed peel
Oil, for greasing
Method
1) Bring the milk to the boil, then remove from the heat and add the butter. Leave to cool for a minute or so. Put the flour, salt, sugar and yeast into a bowl, making sure the salt and yeast are on separate sides. Make a well in the centre. Pour in the warm milk and butter mixture, then add the egg. Mix well, bringing everything together with your hands until you have a sticky dough.
2) Put on a lightly floured surface and knead by holding the dough with one hand and stretching it with the heal of the other hand, then fold it back on itself. Repeat for 5 mins until smooth and elastic. Place the dough in a lightly oiled bowl, covered with oiled cling film and leave to rise in a warm place for 1 hour and until a finger pressed into it leaves a dent.
3) Tip in the fruit and spices. Knead into the dough, making sure it is mixed through evenly. Leave to rise for another hour, covered with well-oiled cling film to stop the dough getting a crust.
4)Divide the dough into even pieces. Roll each piece into a smooth ball on a lightly floured work surface. Arrange the buns on a well-greased baking tray, leaving enough space for the dough to expand. Cover with more oiled cling film, then set aside to prove for another hour.
5)Heat oven to 200C. Mix the plain flour with about 5 tbsp water to make the paste for the cross. It needs to be a gluey consistency. Spoon into a piping bag with a small nozzle. Pipe a line along each row of buns, then repeat in the other direction to create crosses. Bake for 20 mins in the oven, until golden brown.
6) Heat the apricot jam to melt it, then sieve to get rid of any chunks. While the jam is still warm, brush over the top of the warm buns and leave to cool.

Posted in recipes | Tagged , , , , , , , , , , , , | 1 Comment

Kinda sausage cassoulet with a warm broccoli salad: Takes longer than 30mins Mr Oliver!

A delicious sausage cassoulet for all the family!

A delicious sausage cassoulet for all the family!

After getting snowed in for a day or so, I found myself slowly going mad with boredom. It was one of those days where I found myself switiching between tv channels watching a number of different food based programmes. Even though these are usually my favourite programmes to watch, I even found myself getting itchy feet watching them. Re-runs of Jamie Oliver’s 30 Minute Meals were being shown and I found myself tutting and thinking not again.

I stopped myself however, realising I hadn’t seen this particular episode, where Jamie whips up his ‘kinda sausage cassoulet’ with a warm broccoli salad and meringues. Obviously the meringues, topped with lemon curd, berries and greek yoghurt got me ruing my Lent predicament. But, the cassoulet and broccoli made me think oh yum! What better way to warm up from the bitter cold than to make a cassoulet using ingredients from the stock cupboard a la Nigel Slater.

As I salivated watching Jamie throw every ingredient into the pan with bounds of enthusiasm with no regard for keeping his kitchen clean, (my mum notes this with a sigh each time she watches him cook) making the 30 min deadline with ease, I thought I want to make that.

Remembering usefully that we have a copy of Jamie’s 30 Minute Meals, I set about preparing my ingredients. As usual, my recipe differs from Jamie’s according to what ingredients I had in my store cupboard and to my habit of deleting or adding ingredients out of my inventiveness. Jamie’s recipe says, “to start get all your equipment and ingredients ready.” By the time I had chopped and got all my ingredients out, I had nearly used up the first half of my 30mins. Just as well I didn’t have a deadline Mr Oliver! The 30min title is questionable and needs stretching a little to allow for preparation time!

Jamie's 30 Minute Meals

Jamie’s 30 Minute Meals

Jamie advises using a roasting tin to cook the cassoulet, putting it on a gas cooker. Unfortunately, I don’t have a gas cooker, so it was a Le Creuset oval casserole pot which I put on the hob. Jamie puts his chipolata sausages in the oven for 8 minutes before putting it in the cassoulet tin to finish. However, because I used cumberland sausage which I cut into chunks, the sausage needed longer, so I put them in the oven for half an hour before putting them back into the cassoulet at the last minute.

Cumberland sausage

Cumberland sausage

Jamie recommends using thick slices of bread to make the breadcrumbs, but I used a french baguette because I had one in the house. I decided to leave out the bay leaves, but I added a tsp or two of chilli. Jamie continually adds sage in his method. He adds some when cooking the veg, then some to the breadcrumbs then some to the top of the breadcrumbs. I decided I would probably be saged out, so I decided not to add some to the top of the breadcrumbs. He also adds two layers of breadcrumbs, one below the sausages and another on the top. I bucked all of my breadcrumbs onto the top of the sausages! Otherwise, I stuck to Jamie’s method.


sage breadcrumbs

sage breadcrumbs


While the broccoli looked good and appealing to the eye on the programme. We all agreed after cooking, that we didn’t like the cold sauce on the broccoli. I personally thought it was overly lemony. The method said to grate the onion and tomatoes, but without suitable grating equipment, I decided to use the food processor again for ease. The broccoli sauce might have worked on a fresh, hot summery day but in the depths of a spring which feels more like winter, the broccoli sauce wasn’t the best accompaniment. I have included the method if you would like to try it, but you could easily just serve broccoli with the cassoulet.

warm broccoli salad

warm broccoli salad

Another criticism of Jamie’s book is that each dish in the 30min meal is mixed together in the method. This can make it a little awkward to follow especially if you are following the deadline!

Kinda Sausage Cassoulet served with a warm broccoli salad

What you need

For the cassoulet:

4 rashers of smoked bacon
1 1/2 red onions
fresh rosemary sprigs
a small bunch of fresh sage
2 tsp chilli powder
2 leeks
400g Cumberland sausage
Half a french baguette
2 cloves of garlic
680g of passata
400g of butter beans
400g of haricot beans

For the broccoli:
400g tenderstem broccoli
1/4 red onion
1 clove of garlic
2 ripe plum tomatoes, chopped
1 lemon

Extras:
olive oil
salt and pepper, for seasoning

Method

1) Cut the Cumberland sausage into chunks about 2-3 inches long and add to a roasting tin with a glug of oil. Cook in the oven for about 30mins or until brown and cooked through.

Cumberland sausages ready for roasting in the oven

Cumberland sausages ready for roasting in the oven

2)Cut the smokey bacon into chunks and add to a casserole pot with a little olive oil. Fry on a high heat. Halve, peel and slice the red onions for the cassoulet.


Chopped onions

Chopped onions


Chop the rosemary and sage. Keep a little sage back for the breadcrumbs. Add the onions, rosemary and sage to the pot.

Chopped rosemary and sage

Chopped rosemary and sage

Trim the leeks and remove the outer leaves. Wash and then slice.

sliced leeks

sliced leeks

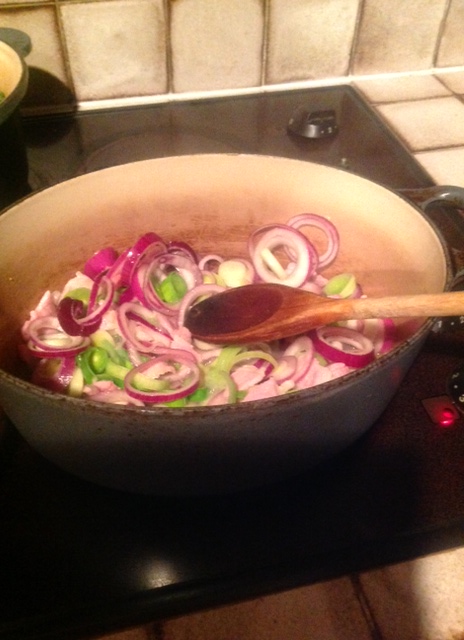
Add the leeks to the pot and a few splashes of boiled water. Stir the ingredients and leave to soften. Stir again after about 10mins.

Allow the vegetables to soften

Allow the vegetables to soften

3) Tear the baguette, using only the inside soft bread which should be put into a food processor in chunks. Add some salt, pepper, the reserved sage, 2 cloves of garlic and a drizzle of oil. Pulse until you have even breadcrumbs.

Sage breadcrumbs

Sage breadcrumbs

4) Stir the passata, the butter beans and the haricot beans into the cassoulet. Add the chilli powder.
5) Peel the red onion for the broccoli sauce and chop finely. Add to the food processor (taking out the breadcrumbs and washing before) Add a clove of garlic, then the chopped tomatoes. Add some olive oil and season. Then squeeze in the juice of a lemon and mix.
6) Cook the broccoli. Trim the ends and heat a saucepan of water. Put the broccoli into the water stalks down and put on the lid. Bring to the boil and cook for a few minutes until tender.
7) Back to the cassoulet: Add the cooked sausages to the pot. Mine formed a layer. Sprinkle over the breadcrumbs and put the pot into the oven for 4mins or until the breadcrumbs are a golden brown.
8) Serve the cassoulet. Drain the broccoli and pour over the cold sauce. (if desired)

How did it taste? The dish was warming and thoroughly delicious. It was hearty and flavoursome. It’s a great budget family meal. We decided we didn’t like the sauce but this element can easily be left out. Enjoy!

Posted in recipes | Tagged , , , , , , , , , , , , , , , , , , , , | Leave a comment